Text extraction from images is an important aspect of keeping records. This is because manually transcribing text seen in images and PDF formats is insanely time-consuming and inefficient.
Fortunately, optical character recognition (OCR) technology has made it much easier to transcribe text from non-copiable sources. The process is known as image-to-text conversion, but is commonly referred to as OCR as well.
Today, we are going to teach you how to use such a tool to extract text from images and PDF files.
Step-By-Step Guide for Text Extraction From Images and PDFs
The process is quite simple, as you will see soon. The gist of it is to find a good tool and input your image or files from which you want to extract the text. The details are given below.
1. Find a Good Text Extractor
You need an internet connection for this entire process to work, this is because we are going to use an online tool.
Here’s how you can find a good online tool.
- Go to Google.com
- Search for the term image to text converter
- Browse the top 10 results
- Select a tool from one of them
To make it easier for you, we will suggest a tool that we use ourselves. It is called Ocronline.io. We use this tool because it is free, accurate, and does not limit the number of uses. So, you can use it a lot.
Going forward, we will be using OCR Online for this tutorial as well. So, if you want to follow along, you can use it too. But if you want to use a different tool, don’t worry; most of them work in the same way, so the same steps will apply.
2. Input Your Files
Once you have navigated to the tool page, it is time to upload the files you need to extract the text from.
To do this, just look at the web page; there should be a conspicuous input field accompanied by text like “Upload” or “Paste.”
OCR online looks like this:

As you can see, there are three options for inputting files. They are uploading, copying, and pasting a link to an online file. You can use any method that is the most convenient for you.
We uploaded four different files here: two PNG images, a PDF file, and a docx file. This is what our interface looked like:

3. Extract Text
Now that we have input the images and files, it is time to extract the text. This is a simple matter. As you may have seen in the previous images, there is a conspicuous purple button with the label “Convert to Text.”
All you need to do is press it, and the conversion will begin. You just need to wait for a little bit (one or two seconds), and your output will be ready.
This is what our output looked like:
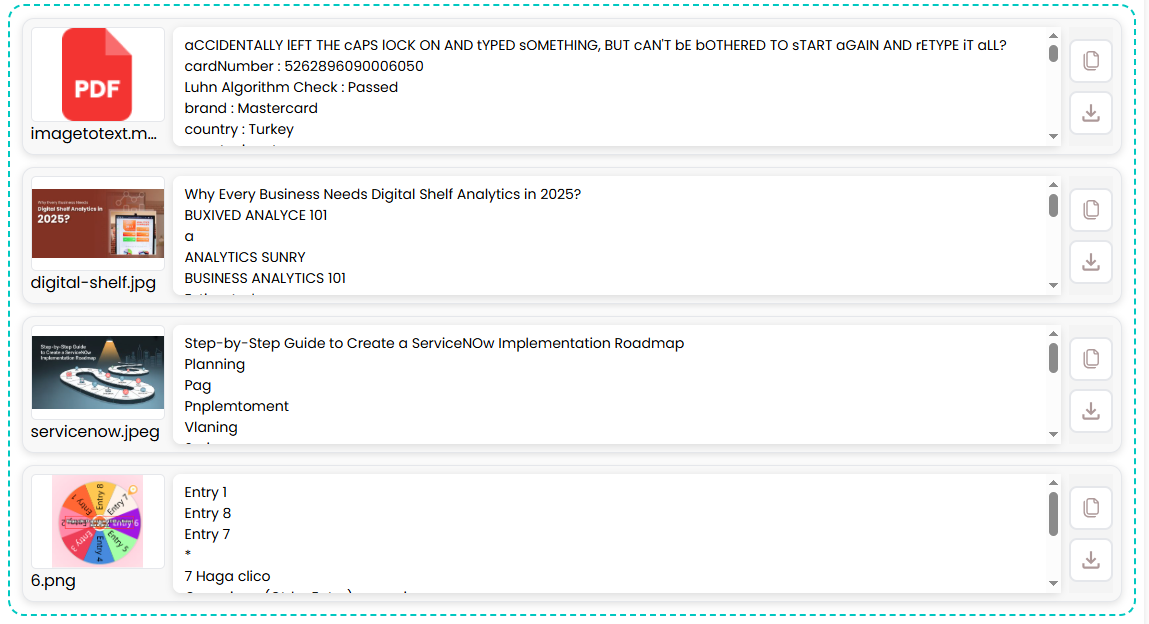
As you can see, the text from each file is written in front of it, so there is no chance of confusion and mix-ups.
But before you can use this text, make sure it is correct. The output field allows you to edit the text, so if there are any mistakes, you can fix them right here. Not that there will be mistakes, but it's better to err on the safe side.
4. Copy/Download
Once you have made sure that your output is according to your liking, you can copy or download it. As you may have already seen in the images provided, there are several places where a download button and a copy button are placed.
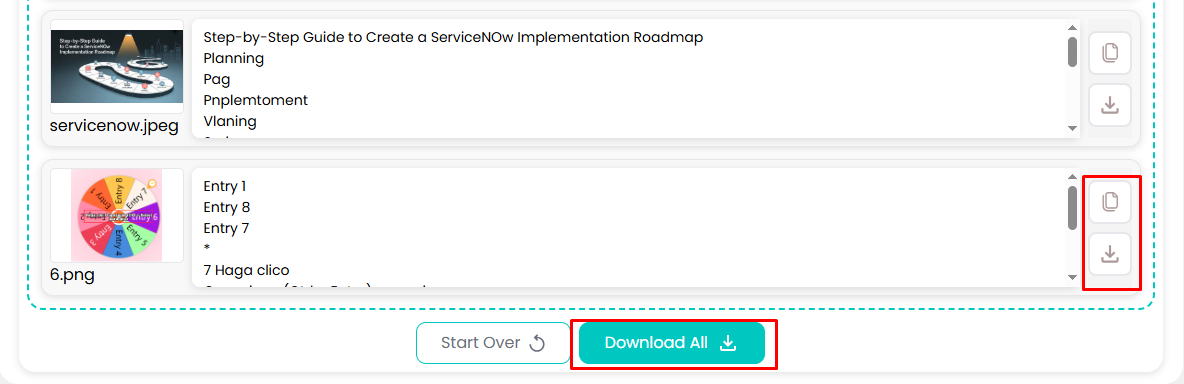
Just click on one of these to download your results in TXT, DOCX, or PDF formats. And that’s all there is to text extraction from images.
Conclusion
So there you have it: how to extract text from images and PDFs using OCR technology, complete with examples. With tools like Ocronline.io, you can easily convert photos or PDFs into editable and searchable text.
These tools make tedious tasks effortless, fast, and highly accurate, ultimately enhancing productivity. After reading this guide, you should be able to perform text extraction without any difficulty.